Cage is pretty close to being done. I took a trip down to see Sean at DSX last night and get an update. The A-Pillar, Rocker, Halo, Driver Door Bar are tacked into place. Sean mentioned he'd start finish welding up the rear of the cage later today to seat everything in place, then work his way forward adding in the offset X in the door and other optional bars (Roof X, Strut Tower Brace, etc.) The Drivers Door bar was kicked out a bit to give me a bit more room inside the car. I think it's going to look pretty neat once it's done (Good thing I gutted the doors beforehand) I'm pretty excited to get it back and start working on paint. It's turning out to look like a real race car now, haha.
Thursday, February 25, 2010
Wednesday, February 24, 2010
Gears Together
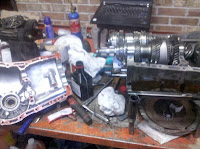
Last night concluded my transmission work (hopefully, lol). I got the box back together within 3-4 hours. We'll see if I put it together correctly, haha.
I'm glad I took it apart in the first place because i had gunk everywhere. I even had some sort of buildup on the inside of the gear stack pinion shaft. A little dip in a few gallons of 93 octane dissolved and cleaned just about everything. I made sure to be extra careful with the bearings as just a little bit of dirt could really jam them up. I made sure to re-lube them and reassembled the gear stack. following the stacks I made sure to clean and re-lube the front diff as well as get all the particulate out of the case itself. A good portion of this build was just having the time to make sure *everything* was clean. Threw the transfer case back on and called it a night!
Tuesday, February 23, 2010
Motor Back
Finally got the motor back. Heads are cleaned and machined (have to take them apart anyway to replace the cams - But I'll do that later on) Block was measured, (.001 out of round but whatever) honed and cleaned. I couldn't get my hands on some ACL race bearings, so I just settled with the normal stuff. As long as it lasts one season I'll be happy. The crank was ground and polished - they took .010 off the face which isn't too bad, but it did require machining. So, I'll be reassembling it soon - Hopefully before the car comes back from DSX.
Monday, February 22, 2010
Cage Update and Working Center
This weekend was kinda hectic - haven't been able to post but I have made a lot of head way. Sean at DSX has moved along great on the cage, finalizing all the rear bends/fitment. I think it looks great so far. He mentioned he's going to bend up the A-Pillar tubes next, install the front box plates, then move to building custom seat brackets to integrated the seats into the cage. It's a bit interesting trying to build the car for both Jamie and myself as the seat positioning will be a bit different for both drivers, but Sean has some cool ways of accommodating.
One really cool thing Sean did was aligned the main hoop cross with the X on the down tubes to allow for more visibility. They all pretty much cross at the same point, allowing me to see a bit more out the rear window. He also rocked back the main hoop just slightly (still within NASA specifications) to follow the B-Pillar body line and make the car more rigid by tying into it.
In addition to the cage, I found some time to grab a used (not destroyed lol) center diff from DSG up in Mass. (Thanks Bill). Cleaned up the internals on the transfer case, washed the transfer gears and re-lubed them and reinstalled the center. It was a fairly easy process, just need to make sure you don't forget the shim! haha. Now it spins without making a terrible grinding noise, lol.
Friday, February 19, 2010
The Carnage...
Really I can't get a break with this damn car. haha. So in disassembling the transmission to fix what I thought were the rear bearings - turned out to be the transfer gear bearing on the center diff. So I decided to remove the center diff and do some inspection. I was given a "Free" transmission by one of my friends (Thanks Justin) although - the word "Free" usually comes with disclaimers.
After I popped my transfer case apart and removed the diff, I realized that the bearing (although still intact) was pretty destroyed. So I removed it - Quick bearing separator action in my press and off it came. When I cleaned it up with some brake cleaner and inspected it a bit closer, I found there to be hairline fractures of the center differential casing. This must have been caused by the bearing overheating.
So - That "Free" transmission... I figured, Hey! Maybe the diff is good out of this one! - Well after draining the metallic sludge from the box and fighting with the seized linkages - I pulled the center diff out of that one. Not only was the transfer gear bearing obliterated, but the diff itself was physically busted. You can shake the diff and hear parts floating around. ah man - At least it's not a 6 speed, lol.
Thursday, February 18, 2010
Plates and Main Hoop
So I swung by DSX last night to talk with Sean and take a peek at the cage so far. He's boxed off plates for the main hoop and down tubes. I personally think the look of boxing up the plates is much more clean - I don't know if there's added safety behind his madness, but so far so good. Sean said he'd fabricate the rear of the car first then move forward so I expect we'll be seeing some down tubes soon.
Wednesday, February 17, 2010
Goodies
So even though there's nothing really to work on yet... And I'm bored out of my mind... That doesn't stop the goodies from rolling in. My Delta 2000 grind cams cam in last night (found them after I buried the box in snow by accident with the plow, lol). These should help move the power band more towards the higher RPM range. Living above 4500-5000 RPM on the track all day would be kinda sucky without being able to access what little power this N/A has. Hopefully tonight I'll take a trip down to see Sean and take a few pics of his work so far. Stay Tuned.
Tuesday, February 16, 2010
Cage
Monday, February 15, 2010
Windows and Cage Ready
Well the deadline to diliver the car to DSX has arrived quickly. I finished prepping the car by removing the windows, throwing the front wheels back on and bolting in the seats. I wanted to vaccume out the interior and pretty it up for most of the work, but that was kinda sidelined.
The windows were a little tedious, but not bad at all. I've read up on people removing them with piano wire or guitar strings but really a braided wire that's strong works fine for. I went to Harbor Freight and snagged a little window remover kit which had that plus some other handy stuff in it.
Although being a 2 person job, the windows came out perfect and all in one piece. I want to retain the windows to use as a pattern for Lexan down the road.
So now she sits, quietly... awaiting the trailer. And ya, I know - My garage is a little cluttered, haha.
Sunday, February 14, 2010
Weight Reduction
So before I bring the car for the cage I have to make sure I cut out all the brackets and remove other little crap that I wouldn't be able to get to otherwise. Once a lot of the bars are welded in, it will be very difficult to get a grinder in behind them. After cutting though the cabin stuff, I had to reinstall the interior I'd be retaining for the track IE: Dash, Heater Core, Blower Motor, etc. I have to make that Sean from DSX can work and build around the existing interior.
I dissected the blower motor and removed the AC core. This saved a bit of weight, but mostly because I welded up the holes and can't physically accommodate the lines that protrude though the firewall.
Following the blower motor and heater core, I hacked all the extra crap out of the dash. I can't believe how light the existing dash is without all the crap in it (airbag, vents, etc.)
I think the coolest thing I did today was Plasma Cut the doors apart. Kris came over today (Drive the EVO in February!? No way...) and helped me out. We made quick work with the doors and probably freed up another 25-30 lbs in both doors. I left the factory door bars in just to be on the safe side.
Friday, February 12, 2010
Rolling Chassis
This weekend needs to be a rush to get the car to be a rolling chassis. I also need to install the heater core, dash, etc. in the interior because the car is going to get a cage installed next week.
The installer is Sean from Driver's Seat Extras - Same place that Subimods is housed in East Hartford. Sean is the guy who designed and constructed the cages for all the EFI ST-2 Cars (minus Jack's). He really knows his stuff and is designing a cage that will be legal once I start wheel to wheel racing.
Thursday, February 11, 2010
Damn you, Whiteline!
Sway Bar installations are one of the easiest and quickest modifications to do on any Subaru - So why did it take me longer to "attempt" to install one than the entire rear end? Oh let me tell you.
Start off with breaking the rear bolt on the drivers side sway bar bracket. Ok, whatever, I'll have to drill it out... So I throw a ton of PB Baster on the others and wait a bit. During this time the snow off Jamie's car is melting into a pool of water right under the back end of the Track Car... Grreaattt...
Move to the passenger side, break that one too - Damn it. Go get the drill, center punch, some bits and a tap. Start to go to town on the bolts - All but one of the bits I brought with me - Dull as a rock. Get more, finally drill them out and the corrosion is so bad the bolts are totally frozen in the frame. So I grab the tap and cut new threads hoping to clean up the existing ones. That works wonders.
Bolt the new brackets up and then I go and grab the sway bar. Now for all those who are already saying "well Mike, an STI bar doesn't fit an RS" - Ya, I know. But the lateral links I'm using are from an STI to move the track out and I've fit up STI bars in that way before on a few swaps. Only problem is that Whiteline must of revised their bar - they only have a small (2 inch) section of strait pipe where the bushing fits. Since the RS is a bit more narrow than the STI, it wont mount to the brackets properly, ug.
The solution here is to check on a few other brands of bars, I know I've used a Cusco in the past so maybe I'll try to source one of those. I guess I should've known things were moving along too smoothly, haha.
Wednesday, February 10, 2010
Front Installed
Installed the main group of front end components with Doug last night. I need to have a rolling chassis that steers to get it on the trailer and to the cage shop. I'm going to use a STI turbo cross member for a few reasons. One being I wont have to replace it down the road when I do the swap, two it uses additional factory bracing and three, it allows me to use the stock 20mm STI Front Sway Bar (mind you is installed backwards in the picture, haha).
For those of you who told me the RS steering rack will not fit in the GD STI cross member - it does. I'll be using a GD rack after the steering column quickener comes back, but for the time being I'll use this one to steer the car.
I also found out that the problem with the transmission lies in the transfer case bearings. So even though I pulled the whole damn thing apart to replace the TRANSMISSION bearings - those are fine. Ah well, at least I'll have bearings for when they decided to leave me.
Monday, February 8, 2010
Rear End Installed
So Doug came over again - and oddly enough, I was doing the exact same job as the last time he came over - only in reverse.
We cleaned out the rear differential and bolted it to the new Diff Mount. We then inserted that into the rear cross member upside down and slid on the T-Brace. Torqued everything to spec - then started to assemble the lateral links. I ended up picking up some adjustable Perrin lateral links (which are mostly spherical links) and installed those prior to bolting up the cross member to the car. We also added grease fittings to all the poly bushings to lube the inner diameter of the metal sleeve.
So here's the moment of truth - The one thing about solid bushings is that if you didn't get the spot on and the frame isn't 100% true, they don't work. We jack up the rear end place all the bolts in the cross member (few threads) then lift up the T-Brace and slide in the bolts. IT FITS - perfectly. I may have to consider shimming the T-Brace if the diff isn't sitting perfectly level, but that's for a later date. I think McLovin said it best, "It's In!"
Sunday, February 7, 2010
Knuckles and Final Bushing
I finished turning up the aluminum bushings and steel sleeves to go into the T-Brace. They seem to fit perfectly, but the T-Brace looks a little bent now that I have perfectly measured/straight mounts, haha. Hopefully it's not too tweaked and I can mount it later. The only way to fix it will be to just cut the welds and re-weld it strait which wont be a huge problem. Annoying, yes, but fairly easy.
So now that the sub frame and T-Brace are finished I moved to the knuckles. The sandblasting never worked out, so I just defaulted to the old school wire brush and painted them up. High Temp Black should do the job just fine.
I also pressed in the new bearings - although not heat treated like I wanted, they should do the trick for a few track sessions until I can source bearings with steel cages to treat.
Thursday, February 4, 2010
MIG, TIG, and Plasma!
I finally got around to buying some replacement consumables for my 110v plasma cutter. My mom picked it up for my Dad awhile back and I kind of... well... "adopted" it for body work use, haha. It never really worked correctly and frankly, I never had much use for it until now.
I figured since I was still waiting for parts for the suspension, brakes, and transmission - as well as waiting to turn up new T-Brace bushings I might as well start welding up some unnecessary firewall holes.
Kris let me borrow is TIG (thank you Kris) to replace my crappy 110v MIG. The MIG is nice for slapping two pieces of metal together like the transmission jig I made. However, when it comes down to really thin sheet metal, I just can't get my MIG to not burn through.
The TIG is a bit harder and welding upside down and on a vertical surface pose their own challenges but I think I managed. The welds look good where I had the proper gap between panels, but where it was more than 1/16th of an inch, it just looks like boogers.
Ground down the welds never the less to make a (relatively) smooth surface. Still rough from weld aftermath, but whatever, it's a race car right? Threw some primer on and went to bed.
Wednesday, February 3, 2010
Subaru 1, Mike 0
Subaru wins this battle - bastards. I was trying to press out the T-Brace bushing last night. Ended up firing a metal slug into my leg while trying, haha. Anyway - those who want to remove the T-Brace bushings - be warned: There is a lip that the bushing presses up against which you can't really see due to the deformation of the urethane. I got it out, but only after I cut the lip off.
After I filled the garage with black smoke and soot from cutting the rubber I just went inside and designed up some new solid bushings in Google SketchUp. (neat program by the way...)
So the odd height of the drawing is related to what I had to subtract out of the total height of the bushing to accommodate for when I raised the rear cross member up. I need to make sure the diff sits as level as possible to avoid drive train tweaks.
Monday, February 1, 2010
Painting
In between waiting for the parts and waiting for the specialty tools to get here (to finish the trans) I figured I'd clean up some extra parts. The rear cross member and T-Brace are rusty as I mentioned before... Couldn't come by a sand blaster soon enough to meet my demands so I just cleaned them up best I could and slapped some primer/paint on them.
I also cleaned up the front body work a bit and put a few coats of white paint on it. I was told white might not be the best choice for the track car as it may get really crappy - but whatever. If someone has a better suggestion - please let me know!
Subscribe to:
Posts (Atom)